
DIY: Build a Bluebird Box
With a few tools and materials, you can make a home for bluebirds in your backyard.

Warren H. Lauder, who spent 38 years analyzing bluebird boxes, created the design for this bluebird box.
Tools
Handsaw
Tape measure or ruler
Drill
Chisel or knife
Hammer
Screwdriver
Materials
You can use any type of wood, but it should be 3/4-inch thick and unpainted/unfinished. White pine is a good choice because it is easy to obtain. Do not use particleboard or plywood.
One 11-inch piece of 1x12-inch wood (for the roof)
One 23-inch piece of 1x8-inch wood, trimmed to 61/2 inches (for the sides)
One 32-inch piece of 1x6-inch wood, trimmed to 5 inches (for the front and back) Carpenter’s glue
16 seven-penny (7d) galvanized box nails or 2-inch deck screws
1 brass 11/4-inch wood screw or 2-inch deck screw
Small tube of caulking compound
1 asphalt roof shingle
8 3/4-inch roofing nails
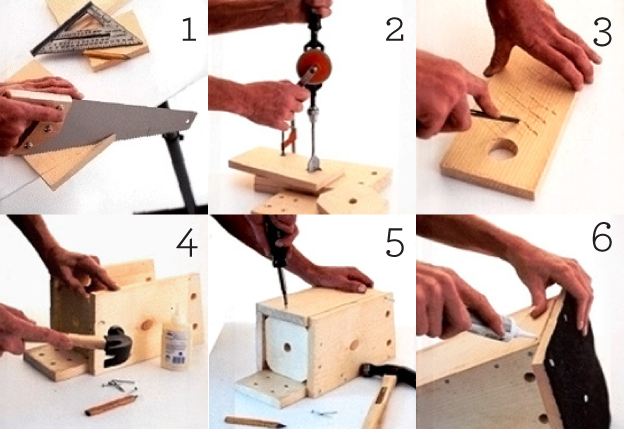
Instructions for assembling the box
Cut the top piece of the nest box, 11 1/4" x 11".
Cut the two side pieces. They should be 6 1/2" across; the rear edge should be 12 1/4" top to bottom, and the front edge, 10 3/4". Drill 5/8" vent holes 1" down from the top and 2" in from each side. Toward the top of the front edge, and 3/8" in, drill a 1/8" hole for a nail or a screw.
Cut the front of the box, 5" wide and 10 3/4" long, with an entrance hole (a 1 1/2" hole for eastern bluebirds or western bluebirds, and 1 9/16" hole where ranges for the two overlap with mountain bluebirds) whose center is 2" from the top and 2 1/2" from each side. Using the chisel, cut deep crisscross scratches on the inside of the front panel. These will allow young birds to climb to the entrance hole and emerge.
Cut the bottom, 5" square, with a 3/8" vent hole at its center. Cut each corner at a 45 degree angle, 3/4" in (to form an octagon).
Cut the back, 5" across and 15" long.
Glue and nail the side pieces to the back. The sides should be nailed flush, and the top of each side should align with the top of the back. The roofline should slope toward the front of the birdhouse.
Glue and nail on the bottom of the birdhouse, recessing it 1/2" from the bottom of the side pieces.
Attach the front of the birdhouse with two nails, through the 1/8" holes drilled earlier, near the top of the side pieces. (This will allow the front to swing open for cleaning.) Put the brass screw into the bottom to secure the front. Leave a gap of 1/2" at the top of the front for ventilation.
Glue and nail the roof on, leaving a 2 3/8" overhang to the sides and a 3 3/4" overhang on the front. Seal the crack at the top rear of the birdhouse with caulking compound to keep the rain out.
Cover the roof with the asphalt shingle, using 3/4" roofing nails; the shingle should extend 1/4 " over each side.